
Do you have some very old videos that are fuzzy or dim? A lot of content providers, editors, and even occasional users retain videos from years ago that are too bad in quality to be reused.
Such videos tend to get detail lost, be noisy, or faded. But they still carry vivid memories or significant stories. Thanks to the CapCut video editor for PC, now you can give those clips a fresh and clean appearance.
Its AI Video Upscaler can assist you in enhancing outdated footage without any hassle. Be it a family video or a vintage vlog, this software allows you to give it a new life. In this blog, you will discover how to revamp flashback content in a few easy steps with CapCut for PC.
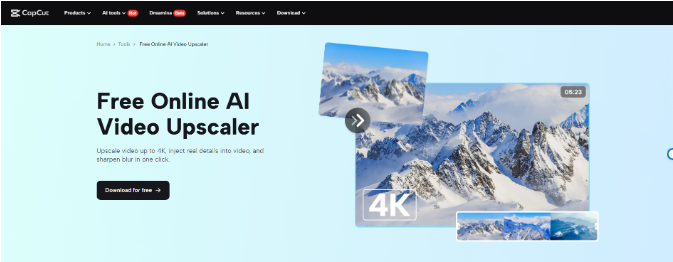
Why AI Video Upscaler to Use on Old or Flashback Content
There are still individuals who retain old videos taken from mobile phones, camcorders, or VHS. Such snippets are normally blurry, black, or unclear. When posted nowadays, they might not be able to command the attention of the viewer. Bad quality videos also decrease how much people will trust or like the content.
That’s where an AI video upscaler comes in handy. This intelligent tool enhances your video’s sharpness, color, and clarity in a matter of seconds. It can erase blur, correct lighting, and give the image a clean, trendy look.
This is ideal for social media stories, online slideshows, or even short documentary pieces. Creators can make low-quality content over again. And if you’d like to add narration to your enhanced video, too, the AI voice generator within CapCut PC can assist with that as well.
The CapCut desktop video editor simplifies the entire process. However, some features, such as the AI video upscaler, might require a paid plan. Nevertheless, the value it offers in restoring past footage makes it a useful tool to try out.
Key Benefits of CapCut PC’s AI Video Upscaler
The CapCut desktop video editor offers many tools, but the AI video upscaler stands out for old clips. It helps turn dull, blurry footage into something clear and fresh. You’ll see sharper edges, better detail, and fewer visual flaws right away.
Its intelligent AI can recognize faces, objects, and movement to enhance them automatically. What this means is your subject remains clean while the background improves as well. It also smoothes out the grain and noise usually present in older or low-light footage.
With some clips, you can even set the frame rate and color tone. This way, the movement appears smooth and the colors appear balanced. You don’t require editing ability or external tools. The process is embedded and simple to navigate.
This AI video upscaler is an awesome tool to use if you wish to revive your old content. The good news? You don’t have to be a pro. The simple and clean interface makes it easy for anyone to use, even for a first-timer editing video.
Steps to Renew Old Video Using CapCut PC’s AI Upscaler
Step 1: Download and Install CapCut PC
To begin, visit the official CapCut website. Download the version of the CapCut desktop video editor that matches your computer system. Once the file is downloaded, install it by following the setup guide.
After installation, open the editor and sign in to your account. Some tools inside the app may require a paid plan to unlock.

Step 2: Import Your Flashback Video
After opening the CapCut PC, tap on the “Import” icon in the top left. This will allow you to import your previous video file into the project. After importing the file, drag and drop it to the timeline at the bottom where you edit. Now you can begin editing it.

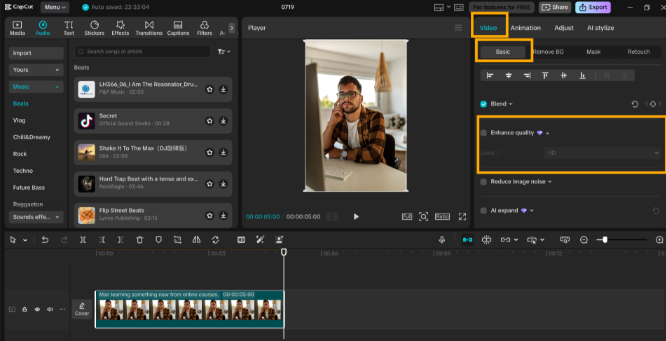
Step 3: Apply AI Video Upscaler
Click on the video clip you added in the timeline. A menu will show up on the right-hand side of the screen. Click on the “Video” tab from this menu. Then, search for the option named “Enhance quality”.
Click it to allow the AI to process your footage. The tool will enhance the clarity, minimize blur, and sharpen the picture. Once the AI is done, preview the outcome. You can also tweak brightness, contrast, sharpness, or resolution if necessary.
Step 4: Include Optional Effects or Text
If you wish to emphasize the fact that the clip is in the past, it includes a brief intro text or date-stamp. You can use light filters or transitions that complement the mood of the memory.
To include voiceover narration, utilize the built-in text to speech AI feature. It assists in describing the clip without having to record your voice. Be simple with the edits, so the video remains clear and easy to view.
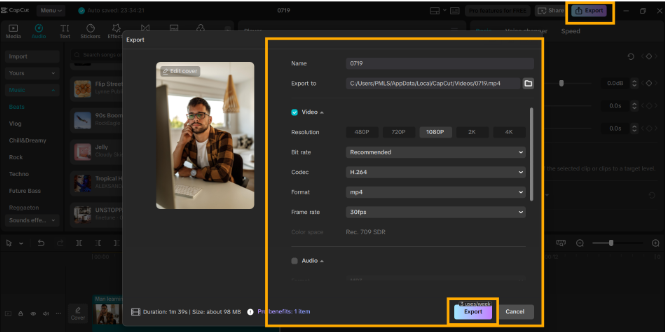
Step 5: Export and Save
Once finished, click on “Export” in the top right corner. Choose your favorite resolution and frame rate. Note that some of the export settings can only be accessed using the premium version. Save the finished video to your device. Then, upload it to YouTube, Instagram, or share it with loved ones.
Conclusion
Old videos don’t need to remain blurry or difficult to view. You can transform them to be clear again using the CapCut desktop video editor within a few easy steps.
It’s an easy method for creators, families, or anyone to revive life into moments from the past. You can repair quality, insert effects, or even create a story, all under one roof. CapCut PC has free and paid tools available, so you can select what suits you best.
Make your old videos shine again, begin upscaling your flashbacks with CapCut PC today.


Leave a Reply